Friday, June 30, 2017

June Outfits

A few of my favorite looks from June...

But first, a few disclaimers: 
1) Approximately all of these posts will be full of mirror pictures. No shame.
2) My cats don't like to be left out.
3) Some of these pieces were sent to me free f charge to review.

Shirt: Old Navy
Sandals: Target Sugarfix
Earrings: Target

Shirt: American Eagle (c/o)
Flip Flops: Rainbow
Necklace: gift
Sunglasses: RayBan
Crossbody: gift

Dress: Loft
Shoes: Super Shoes
Necklace: Stella & Dot

Shirt: TJ Maxx
Sandals: Nine West Outlet

Shirt: eShakti (c/o)
Sandals: Nine West Outlet
Necklace: Loft

Shirt: Loft
Shorts: J. Crew Factory
Sandals: Peebles

Shirt: Loft (similar)
Shorts: fun find at Ben Franklin at the beach last year
Flip Flops: Rainbow
Necklace: Stella & Dot

Monday, June 26, 2017

DIY Calming Glitter Jar


I always see cool crafty project for school counselors on Pinterest, but they're usually geared more towards elementary school students. My high schoolers would probably roll their eyes at me if I brought in a fun little board game about managing emotions. Recently, I've come across several tutorials for these calming glitter jars, and I think my students would actually like to use this one!

A lot of times students will come in upset or worked up about something small. Sometimes I don't even really need to talk to them, they just need a few minutes away from everyone and everything to pull themselves together. I'm hoping this glitter jar will help them focus on the here and now, at least for a few minutes. I also like it because it serves as a timer - some students will sit in my office forever when they really need to be in class, so now I can just have them shake up the jar and once it settles, that will be their cue to wrap things up.

I read a bunch of tutorials on how to make these, and I kind of combined them. I ended up sticking to this one the most.


Here's what I used:
  • Mason Jar (I got the clear ones from the Target dollar section)
  • Clear Glue
  • Food Coloring (I used neon blue)
  • Glitter (I used three different sizes of glitter to add some visual interest)
Here's what I did:
  1. Heat up some water in a pot on the stove. I just warmed mine up a little, not bringing it to boiling.
  2. Put a drop of food coloring in the bottom of the jar.
  3. Fill the jar up about halfway with the warm water.
  4. Add in the glue. You can use however much you want depending on how fast you want your jar to settle. I used a whole bottle, and mine takes about 3 minutes. Use a fork to stir in the glue until dissolved. The warm water helps the glue dissolve smoothly.
  5. Now add the glitter! I was going to attempt to measure mine, but I just kept pouring until it looked right. Stir it with the fork to see how it looks and how long it takes to settle, then decide if you want more. I used maybe half of the light blue glitter from the picture above, and a few shakes of each silver.
  6. Top it off with more warm water if needed.
  7. Put the top on tight. Give it a shake and watch and relax! You can still go back and add more glitter at this point if you want to.
Let me know what you think if you decide to make one!

Friday, June 23, 2017

Target Finds

The other night, my mom and I went into Target to return some things I ordered. We started looking around, and once I saw her come around the corner with a handful of things to try on, it was all downhill from there (not my fault). As usual, we came out with more than we planned on.

He gets just as excited about my shopping finds as I do!

I really needed some new PJ tops for our upcoming beach trip. I usually wear old t-shirts to bed, but when traveling with friends, it's a little embarrassing when I pull out my 4-H Camp t-shirt from 2011. I ended up getting two PJ tops, which will definitely make their way into my suitcase.


Y'all, have you checked out Target's clearance sections lately?! I feel like I never have much luck finding things in my size, but I ended up finding the gray PJ top for $9 and these pants for under $18!


I'd been on the hunt for a pair of pink-ish pants for work, so these were absolutely coming home with me. They were SO soft and comfortable that I didn't really want to take them off to leave the fitting room. Work pants can be tricky for me, so we'll see how they hold up after a full day of work and a few washes.


And lastly, how cute are these tanks?? I loved both, and it took all I had not to toss the champagne one into my cart.

Have you found anything fun at Target lately? Let me know!

Wednesday, June 21, 2017

Nelson 151 Trail

After our visit to Lynchburg, we made our way up the Nelson 151 Trail on the way home. Also known as "Alcohol Alley," the route is knows for its variety of wineries, breweries, and cideries. Oh, and the scenic views of the Blue Ridge Mountains are pretty nice, too ;)

Our first stop was at Hill Top Berry Farm & Winery. They specialized in fruit wines and meads, which is wine made from fermented honey.


After we had a full tasting, we each got a glass of wine (I got apple, Jonathan got melon) and sat out on the patio. Not going to lie, I could have sat out here all afternoon! The rocking chairs overlooking the rolling hills full of grape vines made for the perfect peaceful spot to relax.

Next, we went to one of our all-time favorites, Bold Rock.


We each got a glass of cider (I got Virginia Apple, Jonathan got the IPA) and sat out on the deck to enjoy the beautiful views of the mountains. 

Last, we went to Devils Backbone Brewing Company. This one has been on my winery/brewery bucket list for a while, so I couldn't want to check it off!


I loved the campground/lodge atmosphere! How fun would it be to sit around that campfire on a summer night with a glass of beer and some live music?


As our appetizer, we got smoked deviled eggs. It was an interesting combination of flavors, but they were surprisingly tasty! For dinner, I got the macaroni and cheese with bacon, and it was as heavenly as it looks. Jonathan got the barbecue sandwich. Of course, we each got a glass of beer with our meals (I got the Gold Leaf Lager, Jonathan got the Wait, What?!?).

If you're not already convinced, I highly recommend stopping by at least a few spots on the Nelson 151 Trail if you're in the area!

Monday, June 19, 2017

Day Trip to Lynchburg

As a school counselor, it's no secret that I love visiting college campuses. I was so excited for Jonathan to show me around his old stomping grounds, Lynchburg College! He showed me all around campus, including his favorite spot called The Dell - a grassy area with gorgeous views of the buildings. It even featured a Love sign!


After my personal tour of the campus, we went to check out Downtown Lynchburg. 


I loved the old, industrial charm of the buildings!


Of course I had to document the downtown Love sign as well. How original is this one?!


We then took Riverwalk Trail down to the James River. This spot on the bridge was breathtaking!


The bridge took us to Percival's Island. Talk about some picturesque views!


After exploring Lynchburg, we took the long way home, which included stops along the Nelson 151 Trail - more on that to come!


Friday, June 16, 2017

DIY Chalkboard Cabinet


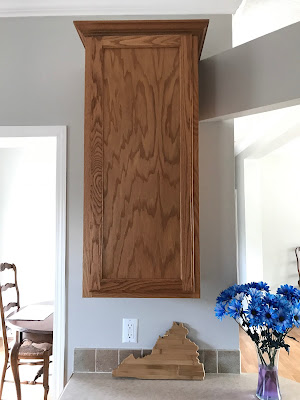
One of the weird little quirks in our new house was this random cabinet. Don't get me wrong, I would never complain about having extra cabinet space, but this one just looked so out of place since it wasn't really connected to anything else.


I debated removing the door so it was just open shelves, but then I realized I wouldn't be able to hide any clutter. If you know me at all, you know I hate clutter. Inspired by one of my fellow DIY-loving friends, I decided to keep the cabinet in tact and turn the door into a chalkboard!


This project was incredibly easy and cheap, coming in at a grand total of $6.98! I bought this chalkboard wall sticker from Amazon, and it came with colored chalk so that was all I needed.

Sidetone: Anyone else completely obsessed with Amazon Prime? Not sure how my poor, impatient soul ever lived without it.

All I had to do was measure the cabinet, cut the sticker to size, and stick it on! I started at the top and only peeled off a small area of the backing at a time as I worked my way down. This method was surprisingly easy, and I was able to smooth out the very few bubbles that came up as I applied it. The whole process took less than ten minutes to complete; it took me way longer to decorate it!

...and now I'm spending the remainder of my day looking up chalkboard ideas on Pinterest.

P.S. Today marks exactly one year until our wedding! Now that I'm off for the summer, planning is in full force. Sorry, bank account!

Thursday, June 15, 2017

Graduation Gift: College Survival Kit


I'm pretty sure gift basket giving is my love language. Instead of one big gift, I love picking up a bunch of little things to go together into a themed basket. With some inspiration from Pinterest, see here and here (are we following each other?), this is what I came up with to give my cousin for her graduation!

First of all, the basket is actually a storage container that she can use in her dorm room. The goodies inside include some tried and true college essentials: a white board, index cards, post-it notes, a water bottle, thumbtacks, pencils, highlighters, a loofah, an air freshener, easy mac and ramen noodles (Jonathan's contribution). I tried to stick with purple and yellow things since she's going to JMU! Also, I found all of these items at either Wal-Mart or Dollar General, and they were almost all under $3 a piece! After arranging everything in the container, I put it in a large clear bag, which I found as a two pack for $1 at Dollar General, and tied it with a bow and a note card with some inspiration. 

Wednesday, June 14, 2017

Sparkling Sangria


What better way to kick off this blog than with my favorite go-to sangria recipe? I made this sangria for my graduation party (pictured above - I made the "cheers" banner, tassel garland, and painted canvas myself!), my dad's birthday party, my brother and sister-in-law's wedding, and I use it basically anytime I need to have enough alcohol to serve a large crowd... and it's always a hit! This particular recipe comes from one of our local wineries, Weston Farm Vineyard & Winery. I sometimes change up what wines wines or fruit I use, depending on what I have on hand. If you don't need to serve quite as many people, you can easily half the recipe.

Sparkling Sangria
2 Bottles Chardonnay Wine
1 Bottle Viognier Wine
1 Bottle Peach Wine
1 Bottle Ginger Ale
1 Bag Frozen Peaches (or fresh if available)
1 Apple (sliced)
1 Orange (sliced)

Put all ingredients, except for Ginger Ale, together the night before and store in refrigerator. Add cold Ginger Ale before serving.

Enjoy!

P.S. Follow me on Bloglovin'! <a href="https://www.bloglovin.com/blog/18942503/?claim=zj26nravhv9">Follow my blog with Bloglovin</a>